
How to Install Certbot on Ubuntu 24.04 Nginx: Easy Steps
In this tutorial, we’ll learn how to install Certbot on Ubuntu 24.04 Nginx to obtain a free SSL certificate and configure it for automatic renewal. Let’s Encrypt is a Certificate Authority (CA) that makes it easy to obtain and install free ...

6 min read
In this tutorial, we’ll learn how to install Certbot on Ubuntu 24.04 Nginx to obtain a free SSL certificate and configure it for automatic renewal. Let’s Encrypt is a Certificate Authority (CA) that makes it easy to obtain and install free ...
- Prerequisites
- How To Install Nginx on Ubuntu 24.04
- Conclusion
Nginx is a powerful and widely-used web server known for its speed, scalability, and ability to handle high traffic with ease. It serves as an excellent choice for hosting websites, acting as a reverse proxy, or managing load balancing for large-scale applications.
In this guide, we’ll cover how to install Nginx on Ubuntu 24.04, configure the firewall to allow web traffic, manage the Nginx service, and set up server blocks to host multiple domains on a single server. By the end, you’ll have a fully functional Nginx setup tailored to your needs.
Prerequisites
Before starting this guide, ensure you have a regular, non-root user with sudo privileges set up on your server. If you haven't already configured this, you can follow our Initial Server Setup Guide for Ubuntu 22.04 to create a user account.
Additionally, it's recommended to have a domain name registered before completing the final steps of this tutorial.
Once you’ve set up your user and optionally registered your domain, log in to your server as the non-root user to get started.
How To Install Nginx on Ubuntu 24.04
Step 1 – Installing Nginx
Nginx is included in Ubuntu's default repositories, making it easy to install using the apt package manager.
Before installing, we’ll first update the local package index to ensure we have access to the latest package listings. After that, we can proceed with the installation of Nginx:
sudo apt update
sudo apt install nginx
When prompted, press Y to confirm the installation. If you're asked to restart any services, simply press ENTER to accept the defaults and continue. The apt package manager will then install Nginx along with any necessary dependencies on your server.
This version improves readability by formatting the code clearly and streamlining the instructions. Let me know if you'd like any further changes!
Step 2 – Adjusting the Firewall
Before you can test Nginx, you'll need to configure your firewall to allow access to the service. When Nginx is installed, it automatically registers itself as a service with ufw (Uncomplicated Firewall), making it easy to manage.
First, check which application profiles ufw recognizes by running the following command:
sudo ufw app list
You should see a list of available application profiles:
Available applications:
  Nginx Full
  Nginx HTTP
  Nginx HTTPS
  OpenSSH
The Nginx profiles are as follows:
- Nginx Full: Opens both port 80 (for unencrypted web traffic) and port 443 (for encrypted HTTPS traffic).
- Nginx HTTP: Opens only port 80 (for unencrypted HTTP traffic).
- Nginx HTTPS: Opens only port 443 (for encrypted HTTPS traffic).
To keep things simple and secure, it’s recommended to enable the most restrictive profile that still allows the traffic you need. For now, we’ll allow only HTTP traffic on port 80.
Run the following command to allow HTTP traffic:
sudo ufw allow 'Nginx HTTP'
You can verify the firewall rules with:
sudo ufw status
The output will display which services are allowed through the firewall, confirming that HTTP traffic is open:
Status: active

To                         Action      From
--                         ------      ----
OpenSSH                    ALLOW       Anywhere
Nginx HTTP                 ALLOW       Anywhere
OpenSSH (v6)               ALLOW       Anywhere (v6)
Nginx HTTP (v6)            ALLOW       Anywhere (v6)
Step 3 – Checking Your Web Server
After installation, Nginx should already be running on your Ubuntu 22.04 server. To confirm that the service is active, you can check its status with systemd:
systemctl status nginx
You should see output similar to the following, indicating that Nginx is active and running:
● nginx.service - A high performance web server and a reverse proxy server
   Loaded: loaded (/lib/systemd/system/nginx.service; enabled; vendor preset: enabled)
   Active: active (running) since Fri 2022-03-01 16:08:19 UTC; 3 days ago
     Docs: man:nginx(8)
 Main PID: 2369 (nginx)
    Tasks: 2 (limit: 1153)
   Memory: 3.5M
   CGroup: /system.slice/nginx.service
           ├─2369 nginx: master process /usr/sbin/nginx -g daemon on; master_process on;
           └─2380 nginx: worker process
This confirms that the service is running. However, the best way to verify that everything is working correctly is by accessing Nginx through a web browser.
To do so, navigate to your server's public IP address. If you're unsure of your server's IP address, you can quickly retrieve it using the following command:
curl -4 icanhazip.com
Once you have the IP address, open your web browser and enter the following URL:
http://your_server_ip
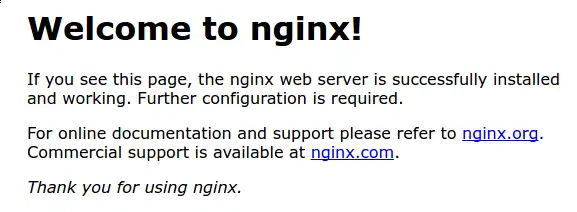
If Nginx is running correctly, you should see the default Nginx landing page, which confirms that the server is set up and ready for further configuration.
Step 4 – Managing the Nginx Process
With your web server up and running, it's important to know how to manage the Nginx service. Below are some basic commands for controlling the Nginx process:
- To stop the web server:
sudo systemctl stop nginx - To start the web server (if it’s stopped):
sudo systemctl start nginx - To restart the web server (stop and start again):
sudo systemctl restart nginx - To reload Nginx without interrupting active connections (useful for configuration changes):
sudo systemctl reload nginx
By default, Nginx is configured to start automatically when the server boots. If you don’t want this behavior, you can disable it:
- To prevent Nginx from starting automatically at boot:
sudo systemctl disable nginx - To re-enable Nginx to start at boot:
sudo systemctl enable nginx
Now that you’re familiar with the basic management commands, you can proceed with configuring Nginx to host multiple domains on your server.
Step 5 – Setting Up Server Blocks (Recommended)
To host multiple domains on a single Nginx server, we use server blocks (similar to virtual hosts in Apache). In this step, we’ll set up a domain called your_domain, but you should replace this with your actual domain name.
By default, Nginx on Ubuntu 22.04 includes a server block configured to serve content from /var/www/html. While this is suitable for a single site, it becomes cumbersome when hosting multiple sites. Instead of modifying /var/www/html, we'll create a new directory structure for your domain inside /var/www.
- Create the directory for your domain: Use the
-pflag to ensure any necessary parent directories are created:sudo mkdir -p /var/www/your_domain/html - Assign ownership of the directory: This gives your user account control over the new directory:
sudo chown -R $USER:$USER /var/www/your_domain/html - Set the correct permissions: Ensure that the owner can read, write, and execute files, while others can only read and execute:
sudo chmod -R 755 /var/www/your_domain - Create a sample index page: Use your preferred text editor (e.g., nano) to create a sample HTML file:
nano /var/www/your_domain/html/index.htmlInside the file, add the following sample HTML:<html> <head> <title>Welcome to your_domain!</title> </head> <body> <h1>Success! The your_domain server block is working!</h1> </body> </html>Save and close the file by pressing Ctrl+X, then Y, and Enter to confirm. - Create a server block configuration file: Instead of modifying the default configuration file, let's create a new one at
/etc/nginx/sites-available/your_domain:sudo nano /etc/nginx/sites-available/your_domainPaste in the following configuration, adjusting the directory path and domain name:server { listen 80; listen [::]:80; root /var/www/your_domain/html; index index.html index.htm index.nginx-debian.html; server_name your_domain www.your_domain; location / { try_files $uri $uri/ =404; } }This configuration sets up the server block for your domain and tells Nginx where to find the site’s files. - Enable the server block: To enable the server block, create a symbolic link from
sites-availabletosites-enabled:sudo ln -s /etc/nginx/sites-available/your_domain /etc/nginx/sites-enabled/Note: Nginx uses symbolic links (symlinks) to manage enabled server blocks. This method allows you to disable a site by simply removing the symlink while keeping the configuration intact insites-available. - Adjust server names hash bucket size: If you're adding multiple server blocks, you might encounter a hash bucket memory issue. To fix this, increase the
server_names_hash_bucket_sizein thenginx.conffile:sudo nano /etc/nginx/nginx.confSearch for theserver_names_hash_bucket_sizedirective and uncomment it (remove the#):http { ... server_names_hash_bucket_size 64; ... }Save and close the file. - Test Nginx configuration: Run the following command to ensure there are no syntax errors in your configuration files:
sudo nginx -t - Restart Nginx: If the test is successful, restart Nginx to apply the changes:
sudo systemctl restart nginx - Test the server block: You can now test your server block by navigating to
http://your_domainin your web browser. If everything is set up correctly, you should see the sample HTML page you created, indicating that your domain is being served by Nginx.
Step 6 – Getting Familiar with Important Nginx Files and Directories
Now that you know how to manage the Nginx service, it’s important to understand the key directories and files that make up the Nginx configuration. Familiarizing yourself with these will help you better manage and customize your server.
Content Directory
/var/www/html: This is the default web root directory where Nginx serves web content from. By default, it contains the Nginx welcome page. You can change this directory in the Nginx configuration files to point to other directories as needed.
Configuration Files
/etc/nginx: This is the main directory for Nginx configuration files. All the essential configuration files are located here./etc/nginx/nginx.conf: The primary configuration file for Nginx. Modifying this file allows you to adjust global Nginx settings such as worker processes, user permissions, and general server-wide configurations./etc/nginx/sites-available/: This directory contains configuration files for each server block (site). By default, Nginx doesn’t use these files until they are linked to thesites-enableddirectory./etc/nginx/sites-enabled/: This directory holds the active server block configurations. It contains symbolic links to the files located insites-available. These are the configurations that Nginx will use to serve sites./etc/nginx/snippets/: This folder contains reusable configuration fragments that can be included in other Nginx configuration files. Snippets are useful for refactoring common configurations like SSL settings or redirects to avoid redundancy.
Log Files
/var/log/nginx/access.log: This log file records all requests made to the Nginx web server. It includes details such as the requester's IP address, the time of the request, the resource requested, and the HTTP response status code./var/log/nginx/error.log: This log file records any errors that occur in Nginx, such as issues with server configuration or problems with serving content. These logs are essential for troubleshooting issues.
You may also like:
Conclusion
In this guide, we’ve covered the essential steps for setting up Nginx on Ubuntu 24.04, including installation, firewall configuration, managing the service, and setting up server blocks to host multiple domains. By following these steps, you now have a basic yet powerful web server that can handle various web traffic scenarios. Whether you're hosting a single site or multiple domains, Nginx provides the performance and flexibility needed for modern web applications.
If you're looking to set up a robust web server on Ubuntu 24.04, understanding how to install Nginx on Ubuntu 24.04 and manage it effectively is a valuable skill. With this knowledge, you’re well-equipped to handle server management tasks and ensure your sites run smoothly and securely.
For more details, you can refer to the official Nginx documentation.
Website Vidya Team
Technology educator and researcher at Website Vidya.
Related Technical Guides
Tested runbooks, server administration walkthroughs, and troubleshooting guides

How to Install PDO Extension in PHP
PHP Data Objects (PDO) is one of the most important extensions in PHP for working with databases in a secure, consistent, and modern way. If you are building dynamic websites, APIs, CMS platforms, or enterprise applications, PDO is not opti...

How To Run XAMPP and IIS Together On the Same Machine
How to run XAMPP and IIS together on the same machine? Well, working together on both IIS & XAMPP can really be a tricky task for beginners. The main aim of this article is to help beginners to get XAMPP Apache Server and IIS server works t...

How to Install PHPMyAdmin on Ubuntu: 4 Simple Steps
If you’re working with MySQL or MariaDB on Ubuntu, managing databases purely from the command line can quickly feel overwhelming. That’s where phpMyAdmin comes in. PHPMyAdmin is a web-based application that provides a Graphical User Interfa...

How To Install Nginx on Ubuntu Server: 4 Simple Steps
This guide covers an easy to follow, step-by-step guide on how to install Nginx on Ubuntu Server 18.04 LTE, 16.04, and 14.04. While writing this tutorial I used Ubuntu 18.04 LTE though these resources in the tutorial are useful in installin...

25 Best Linux Commands Every Sysadmin Should Know
If you’ve spent any time managing Linux servers, you already know this truth: the command line is not optional. It’s where real troubleshooting happens, where performance issues are understood, and where outages are prevented before users e...

How to Fix Snapd Consuming High CPU / RAM on Linux
If you’ve ever opened your system monitor and noticed snapd quietly eating up your CPU or RAM, you’re not alone. Many Linux users—especially on Ubuntu and Ubuntu-based distributions—eventually run into this issue and wonder what’s going on ...

How to Fix SSH Connection Refused Error on Linux: 10 Simple Ways
If you’ve ever tried connecting to a Linux server using SSH and been hit with the frustrating message: ssh: connect to host x.x.x.x port 22: Connection refused You’re not alone. This error is one of the most common (and confusing) issues Li...

How to Reset Forgotten Ubuntu User Password: 10 Simple Steps
Forgetting your Ubuntu user password can feel like hitting a wall—especially when the system refuses to let you log in and you have important work waiting inside. Fortunately, Ubuntu provides a safe and effective recovery mechanism that all...

How to Fix Broken Packages in Ubuntu: 7 Simple Ways
If you’ve been using Ubuntu for a while, chances are you’ve run into package-related issues at least once. A failed update, an interrupted installation, or conflicting dependencies can easily leave your system in a messy state. When that ha...

Fix E: Unable to Locate Package Error on Ubuntu: 11 Simple Ways
If you’ve used Ubuntu for any length of time, chances are you’ve run into this frustrating message at least once: E: Unable to locate package <package-name> It usually appears right when you’re trying to install something important—Docker, ...
Discussion
0No comments on this guide yet. Be the first to share your thoughts or ask a question!